
Using Notist
Managing presentations
Adding a new presentation
Click the + icon to start adding a new presentation. If this is a completely new talk then select "New presentation", if you would like to start by copying details from a previous talk then select Variation on an existing presentation".
If you are creating a Variation of an existing presentation we will then ask you to choose which presentation, and also which of the assets related to that presentation you would like to copy.
At this point you can upload your slides if you have them.
The next step is to assign this presentation to an event. So that we can see if the event already exists on Notist we ask for the location and date and time of the event, if we find matches we will show them to you so you can select one if it is your event. If we find no matches, or this is another event to the ones we show you, you can go on to add details of the event. See editing events for more details.
You can now add the basic details of your presentation, saving these details will save your presentation as a draft.
Adding a slide deck
You can upload your presentation
You have two options when adding a slidedeck to your presentation. If you have a PDF file of your slides, then you can upload this directly to Notist. If your slides are hosted elsewhere - for example of Slides.com - you can give us a link and we will embed them on the presentation page.
Uploading a PDF
Export a PDF file from your presentation software and upload this file. If you have presenter notes in your original deck and would like us to import those as a description for your slide, add a second deck which is an export with notes included.
Processing Your Slides
We will upload your slide deck(s) and try to extract any text from the slides themselves and your speaker notes.
Slides will be saved as images using the most appropriate format for the type of content on the slide. We aim to keep your text crisp and images clear.
This can take a little while, but you can leave the page and come back later.
After Uploading
You can now view and edit the deck, and make any changes to individual slides.
Exporting your slides as PDFs
Every presentation tool is different, but here are some instructions for exporting PDFs from common tools.
If you're familiar with a tool that's not listed and have a successful set of steps for producing the two PDFs, we'd love to share them here. Drop us a line and we'll be sure to add them.
Apple Keynote
Slides PDF:
- Go to File > Export To > PDF
- Under "Image Quality", select "Best"
- Click Next and save the file
Presenter notes PDF:
- Go to File > Export To > PDF
- Select the "Include presenter notes" option
- Click Next and save the file with a new name
Microsoft PowerPoint for macOS
Slides PDF:
- Go to File > Export
- Select the file format as PDF
- Save the file
Presenter notes PDF:
- Go to File > Print
- Under Layout, select "Notes"
- In the bottom left, save as PDF
OpenOffice / LibreOffice
Slides PDF:
- Go to File > Export as PDF
- Make sure that "export notes pages" is not selected
- Under "Reduce image resolution", choose the highest option
- Export
- Go to File > Export as PDF
- This time select "Export notes pages" and "Export only notes pages".
- Export, and save the file under a new name.
Why two PDFs?
When you upload a slide deck to Notist, there's the option to add two different PDFs. What's that all about?
In summary:
- Always upload the Slidedeck PDF (first) file. This is used for creating your slides.
- The presenter notes PDF is optional, and is used for text only in addition to the first PDF
Slidedeck PDF
The first upload field is for the slide deck PDF. This is your nice, pristine set of slides that we will use to create the images that make up your slide deck when shown on the presentation page.
If you're uploading a deck, you always need to add this file. It's the important one, the head honcho, the main deal.
We have some tips for getting the best quality, but if it's a reasonably recent deck (rather than something dusty you've dug out from the early 2000s) you should be able to just export from Powerpoint or Keynote and upload it.
We'll then churn through and make it into images, and extract any text we find on the slides and add that to the description field for each slide. This helps in making notes, and can be useful for search indexing and for users who can't read images well but might like the text.
Presenter notes PDF
The second field is for a copy of your presentation that has been exported with the presenter notes turned on. This is entirely optional, and it only works if you upload it alongside the main slide deck PDF. This is great for presenters who make heavy use of notes.
You can create the presenter notes PDF by exporting from Powerpoint or Keynote and enabling the "include presenter notes" option. This option then adds the text from your presenter notes to the PDF alongside the image.
We then run through this second PDF and extract all that extra text, adding it to the notes field for each slide. No images are used in this PDF - just the text.
It's important if you use this option, that your presenter notes PDF has the same number of pages as the main PDF. We match them up by page number, so whatever notes are on Page 12 of the notes PDF get assigned to whatever slide is on Page 12 of the main slide deck PDF.
Getting the best image quality
We always want your slides to look their best on Notist, and we'll be improving our PDF importer to make sure that's always the case. If you upload a slide deck and find it looks a bit low-res, or is rotated strangely, here's a quick fix you can try.
Delete the old deck
You don't want those crummy, fuzzy, low-res images so in the Slidedeck editor, scroll to the bottom and use the red Delete This Deck button to get rid.
Re-save your PDF
PDFs are scalable vector files, so they should look good at any size. They usually come coded with a default size, which is set to match a projector. Most projectors actually use very low resolutions, especially compared to the nice big images we want on Notist.
If we use images at that size, they'll look rubbish. We can get around it by re-saving the PDF to target a larger output size.
(We're working adding better intelligence to the process to get around this.)
Using Preview on a Mac
Open your PDF in Preview, and then go to File > Print. We'll not be printing the PDF, but instead save it out as a new PDF.
Under Paper Size, select Manage Custom Sizes. We're going to create a custom paper size, so click the plus button at the bottom of the list.
Depending on whether your slides are widescreen or not, set your new paper to the following sizes.
| Aspect | Width | Height |
|---|---|---|
| Widescreen | 960mm | 540mm |
| 4:3 | 640mm | 480mm |
Give your new paper size a name (something like "Slides widescreen" or "Slides 4:3" might be helpful next time) and OK the changes.
If the preview looks good, in the PDF dropdown in the bottom left, select the Save As PDF option and save your new file.
Upload your new PDF
Now that you have a nice resized PDF, upload it to Notist. Hopefully the results will be much better.
Making slides available for download
You can make the original slide deck that you uploaded available for visitors to download by checking the checkbox on the Slidedeck page for that presentation. This will create a link under your slides that will download the PDF.
Note that this enables the download of the original PDF that you uploaded, not a recreated deck with additional information added via Notist.
Adding resources
Resources can be added to a presentation. If you have any external links that you would link to add then add them here and they will appear on the presentation page for visitors to access.
Adding tweets
You can add relevant tweets to your presentation vis the Tweets tab. We will be extending this functionality in future. For now, add the URL on an individual tweet and we will retrieve and embed the tweet to the page for this presentation.
Managing events
Adding a new event
Events typically get added when a presentation is created. If we can't find an event in the location and at the date and time you enter, we will ask you for the title of the event in order to create it.
As the person who created an event you will also be able to edit the other details.
Events can also be added outside of the Presentation creation process. Add an event at this link and, as with the account creation process we will check to see if it already exists before creating it.
Editing an event
If you added an event then you can also edit the event details. You will see an edit bar on the event page if this is the case.
On the event edit page you can provide some additional details about the event such as a URL, event hashtag, and a description.
Claiming your event
Events typically get into Notist when someone creates a presentation. If you are an event organiser you can also create your event in Notist, however you may discover that someone has already created your event and want to update the details.
If you can provide us with a way of confirming that you own this event in some way then we will be happy to give you the right to edit it. You'll need a profile for us to assign it to, so make sure you're logged in and have a username. Then raise a support ticket with a link to the event in question and a way for us to confirm you, and we'll sort it out.
Pro features
Setting up a custom domain
Notist Pro subscribers have the option to configure a custom domain name to point to their profile and presentations on Notist. This enables you to share content on a domain you control, so if you decided to stop using Notist in the future all those incoming links would still point to your domain and not ours.
When using a custom domain, links on the main Notist site point to your custom domain, and any existing links are redirected.
The process
Setting up a custom domain is a four-step process. Don't panic, they're easy steps.
- Add a DNS record to point your domain to us
- Request the custom domain from the Settings section of your account
- We then flip some switches to make it work
- When you're ready, you check a box to make it all active
We'll attempt to explain those steps below, but the DNS bit is the only tricky part.
Add a DNS record
In order to point your domain to Notist, you need to create a CNAME record and point it to:
inbound.noti.st
A CNAME record is like an alias that points from one domain name to another. How precisely you create this will be down to your DNS provider. They should have documentation to help if it's not obvious.
Once you have the CNAME configured and propagated, visiting your domain should show you the Notist homepage. This demonstrates that DNS is configured correctly, so the next step is to tell us to look out for it.
Requesting the custom domain
Log into your account and go to Settings from your profile menu. In the menu (left hand side for desktop users) there's a link for Custom Domain. If you don't see that you may not have a Pro account.
On the Custom Domain page, enter the domain name you've chosen, e.g.
presentations.example.com
Submit the form to make the request. This will both save your preferences and raise a support ticket for us to get it configured for you. We'll use this support ticket to keep you updated.
Making it live
Once we've configured the domain, you'll be able to view your Notist profile using it. However, your pages will still be active on the noti.st domain. To start sending all the traffic through your custom domain, go back to Settings and Custom Domain and check the "Enable this custom domain" box.
Once that's in place, all your presentations and profile links will point to the versions of your pages on your custom domain.
General
Accessibility
We want Notist to be as easy to access as possible for all users, regardless of circumstance. That's a simple goal, but the implementation can be hard to get right.
If some aspect of the site or service is hard for you to use, we want to fix it. It's probably the way it is because we either:
- Didn't anticipate your need as we should have (sorry)
- Tried to anticipate your need but got the approach wrong or used outdated methodology
- Did anticipate your need but a change or coding error has broken it and we didn't spot it
In any of those cases we want to fix the mistake and improve our level of access. Please let us know what's wrong. If you have expertise in what should be done to fix it, we'd really value your advice, too.
Importing and exporting
Importing from SlideShare
If you have presentations already listed on SlideShare and want to bring them into Notist, so that you can display them alongside other information for that talk, this article explains how to do so.
Get your export from SlideShare
Before doing this be sure you will have time to process the import in the next 7 days as the links in the export expire after that time.
Log into SlideShare and under Account Setting > Export download the file of your data. Save this and come back to your Notist account.
Importing the slide decks
In Notist go to Edit Presentations > Imported and select SlideShare. Upload the file that you downloaded from SlideShare, and the data from the file will be imported.
Linking a deck to a presentation
SlideShare only shows slide decks, it doesn't have the information about the event or talk that we have on Notist. Once your decks are imported you will have a little work to do to link them up with an existing talk, or create a new talk to attach them to.
Click on the name of any deck, on the next screen you will be able to choose what to do with it.
If you choose to create a new presentation, you will end up in the usual process to create a new talk, with potentially a new event.
If you have presentations already created which do not have a slide deck listed, then select add this deck to an existing presentation. A list of talks with no slides will appear and you can choose the appropriate talk.
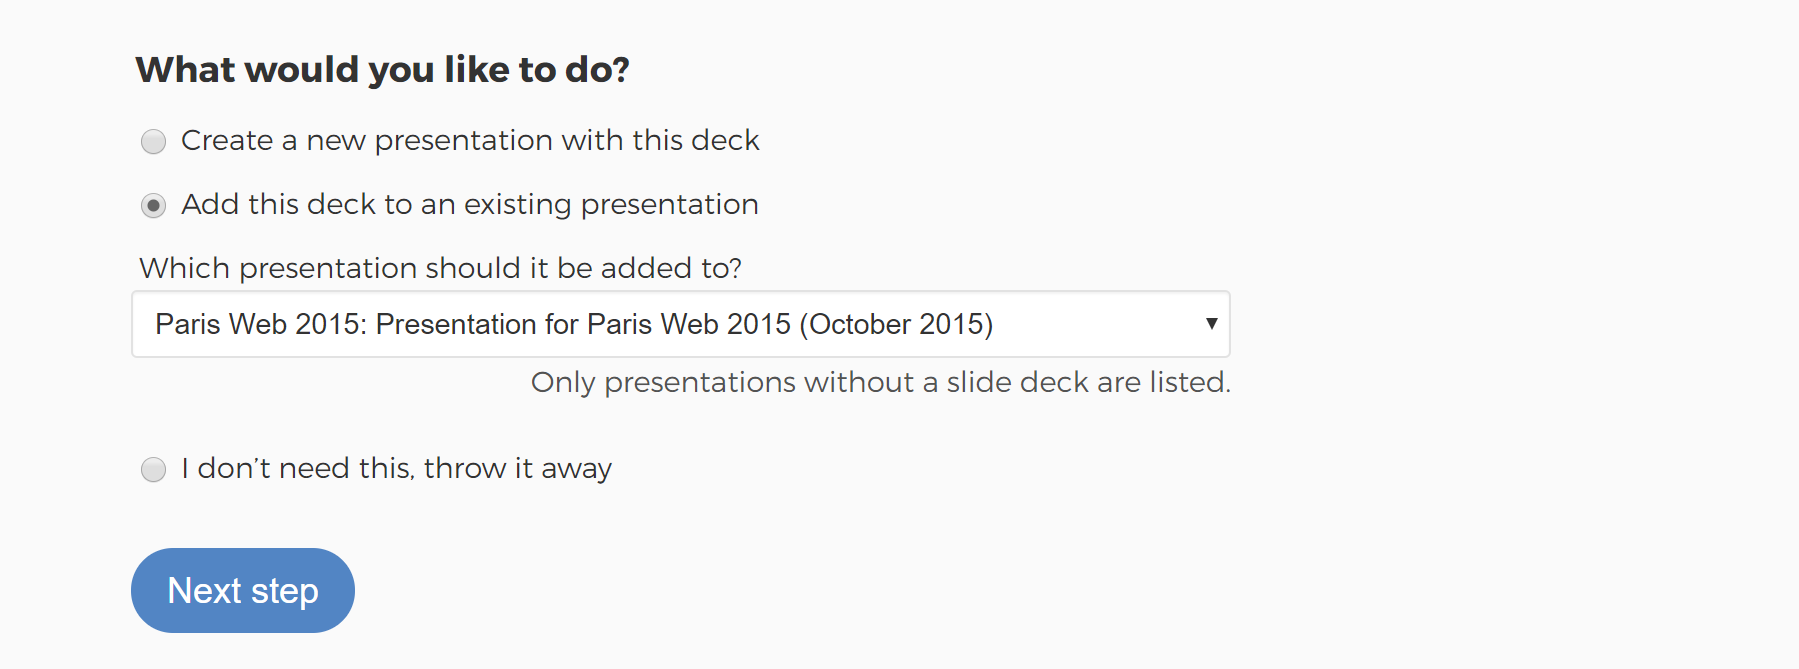
As we then already have the information for the talk we can go straight into processing the slides.
If you don't want to list these slides, or they are a duplicate of some you already added before the import was available, then choose I don't need this. Throw it away, and we will get rid of it from your list.
Any problems during the process, then raise a ticket in support and we'll help you out.
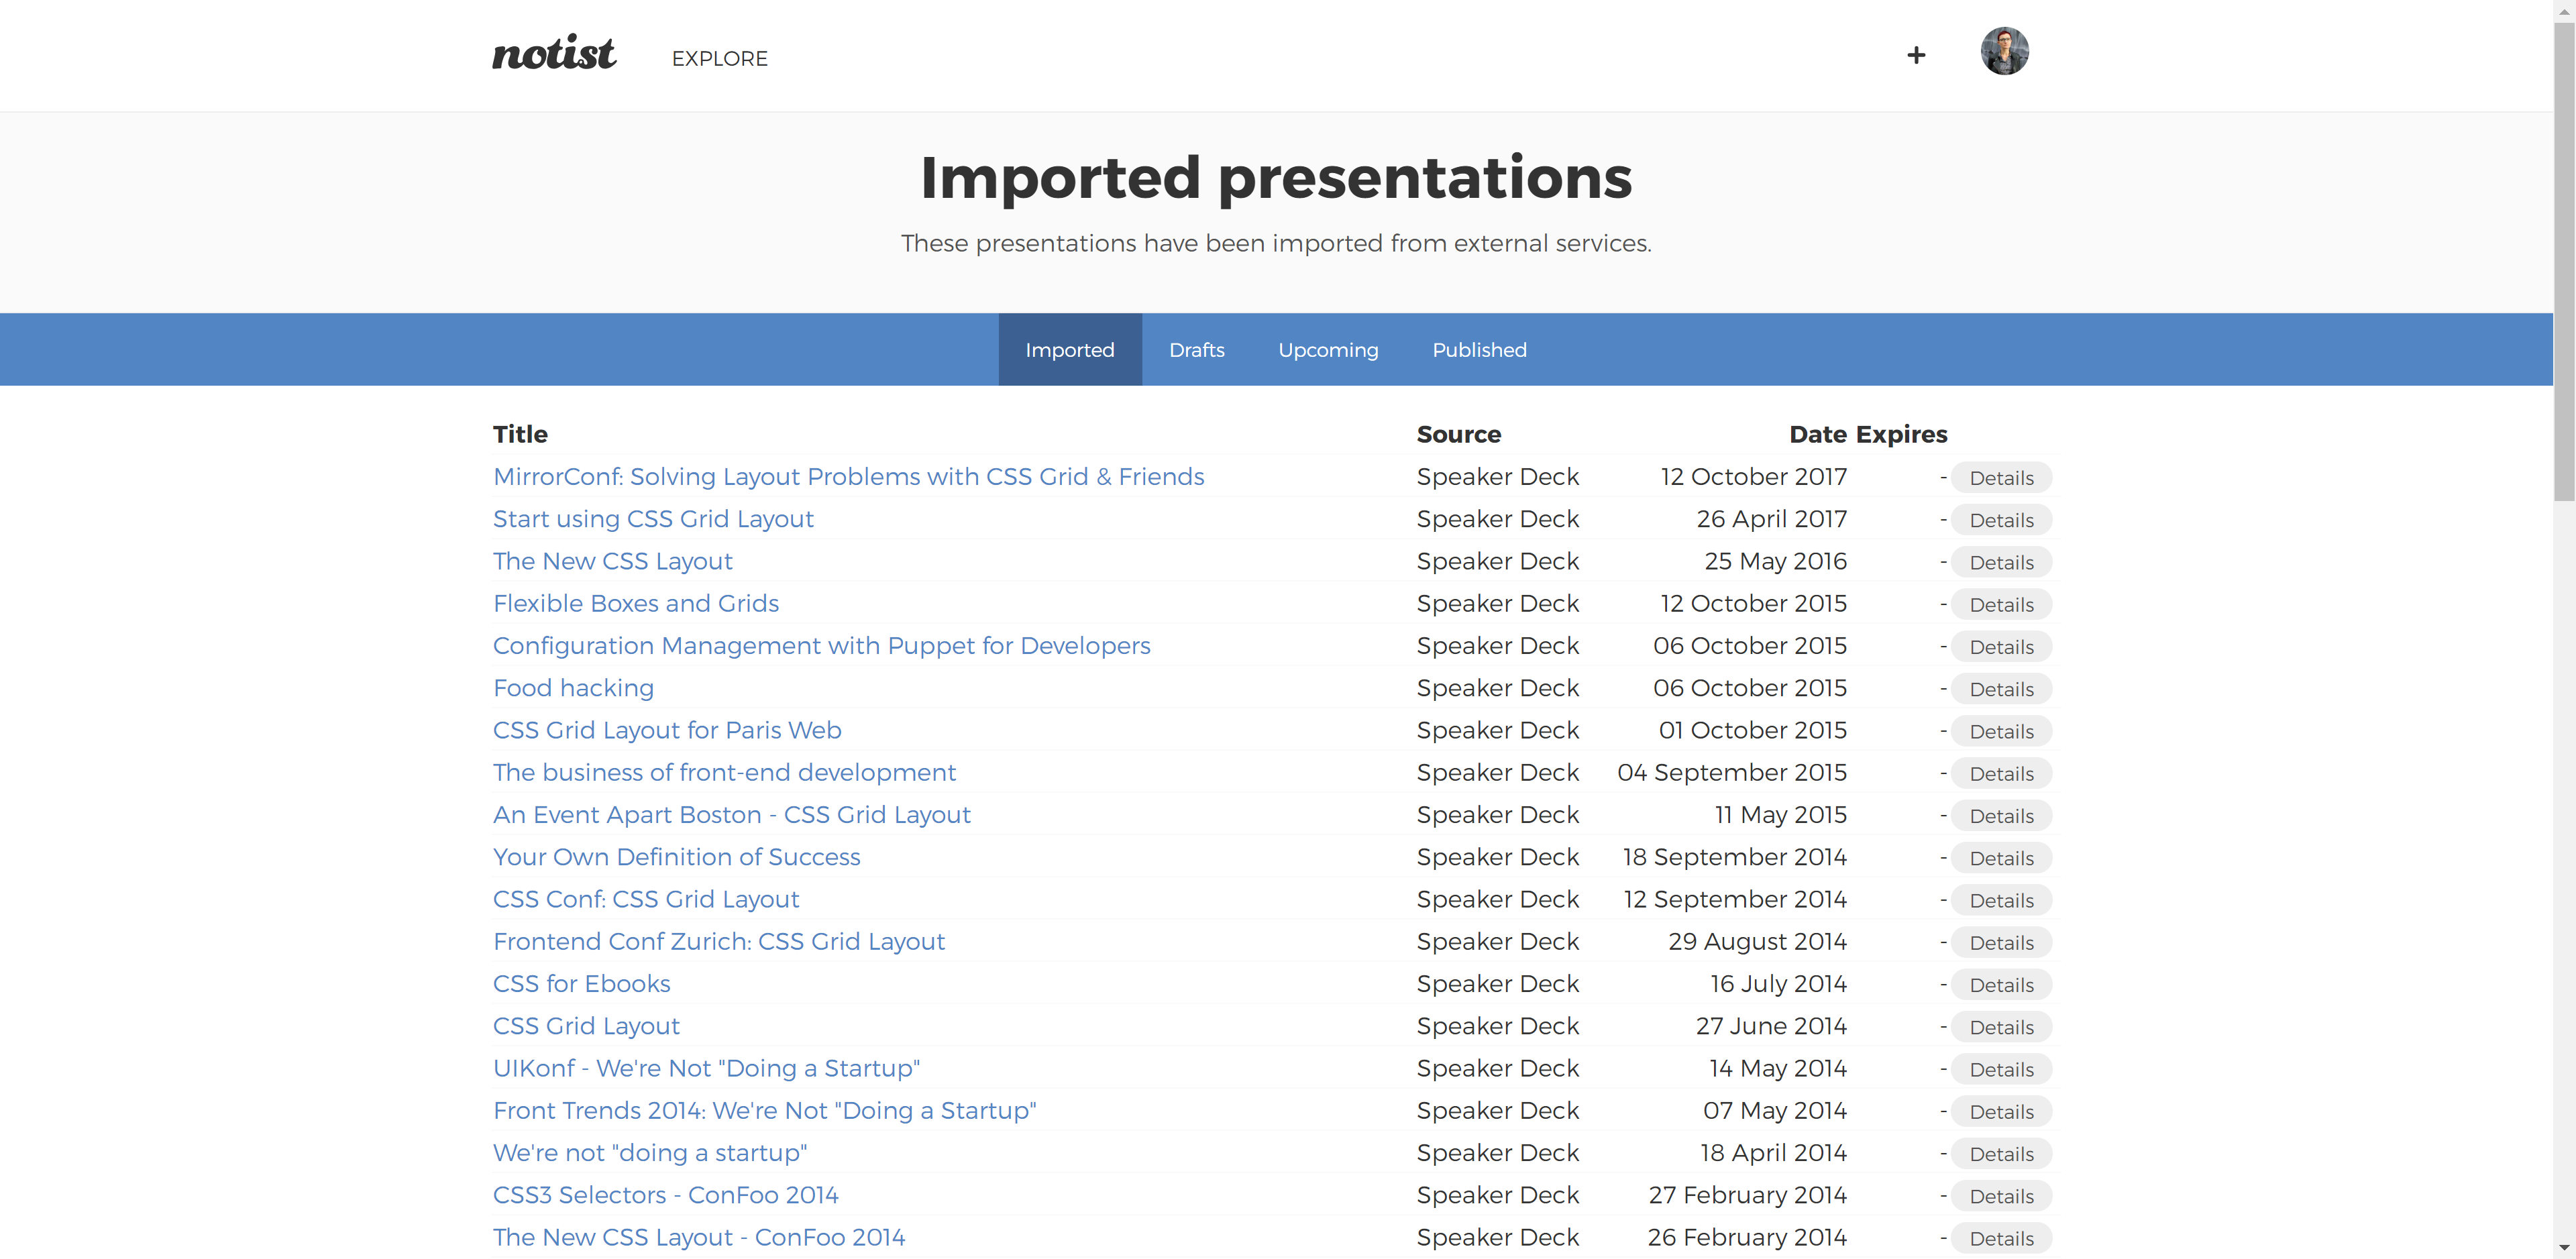
Importing from Speaker Deck
If you have presentations already listed on Speaker Deck and want to bring them into Notist, so that you can display them alongside other information for that talk, this article explains how to do so.
Importing the slide decks
You need your Speaker Deck username to get started. Then head to your account on Notist, and go to Edit Presentations. Click the Imported navigation item, and select to import from Speaker Deck.

Pop your Speaker Deck username into the field, and your import will be queued.
The process shouldn't take too long, however we want to be respectful of third party servers and so at busy times it may take a little while. Once the process is complete you will find a list of the presentations that we found, under the Imported navigation item.
If the process takes hours, then please raise a support ticket and we'll investigate what is happening for you!
Linking a deck to a presentation
Speaker Deck only shows slide decks, it doesn't have the information about the event or talk that we have on Notist. Once your decks are imported you will have a little work to do to link them up with an existing talk, or create a new talk to attach them to.
Click on the name of any deck, on the next screen you will be able to choose what to do with it.
If you choose to create a new presentation, you will end up in the usual process to create a new talk, with potentially a new event.
If you have presentations already created which do not have a slide deck listed, then select add this deck to an existing presentation. A list of talks with no slides will appear and you can choose the appropriate talk. As we then already have the information for the talk we can go straight into processing the slides.
If you don't want to list these slides, or they are a duplicate of some you already added before the import was available, then choose I don't need this. Throw it away, and we will get rid of it from your list.
Any problems during the process, then raise a ticket in support and we'll help you out.
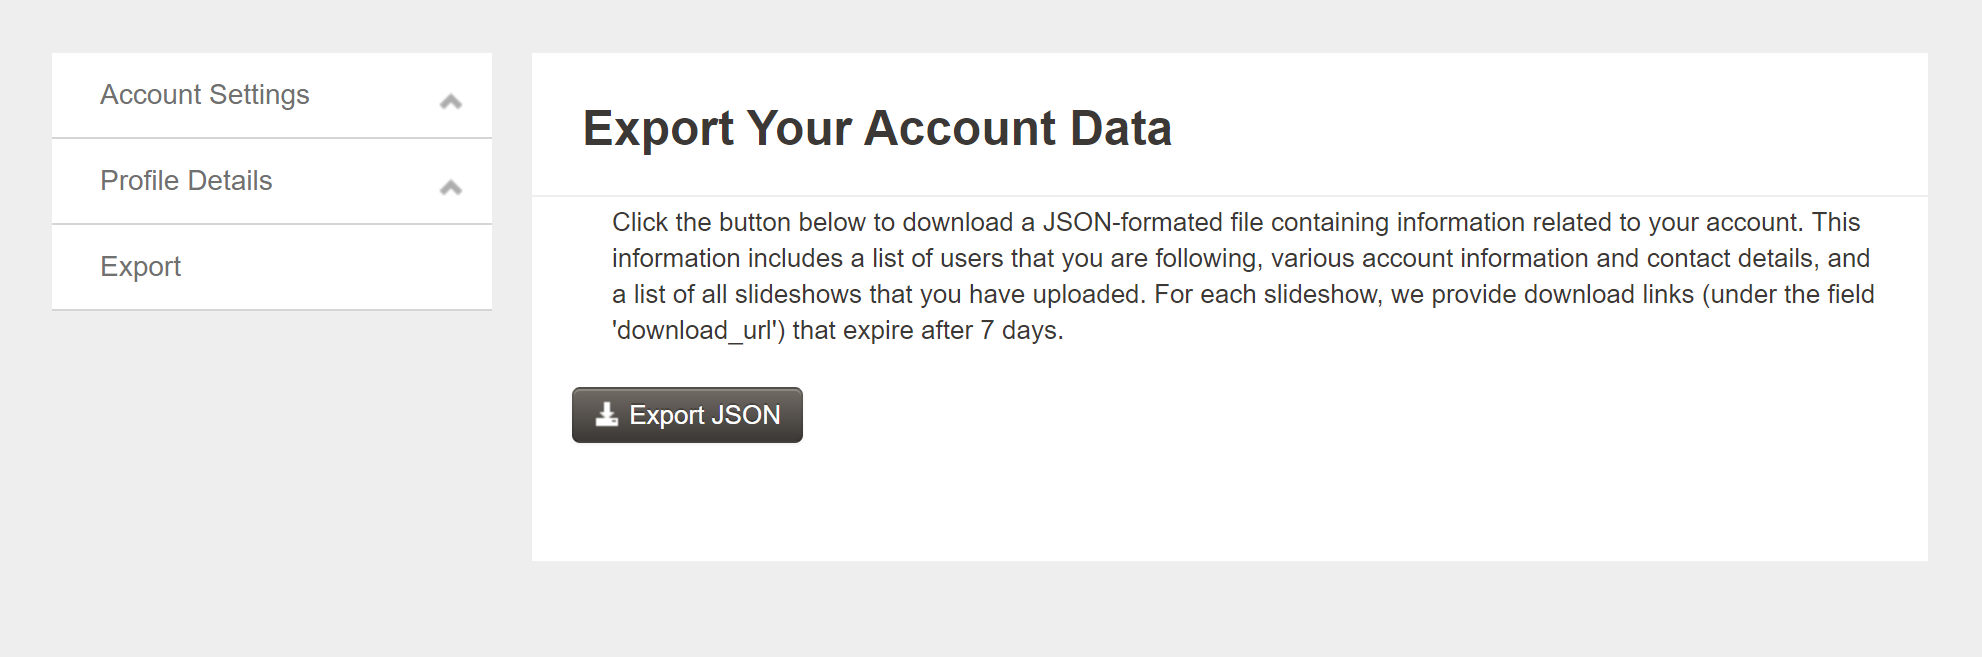
Exporting data from your account
We are very keen that your data is not locked up inside our platform. It belongs to you and you should be able to keep a backup of it, or take it somewhere else in future in an easily usable manner. So we will be offering full export of data held in Notist.
During the beta data export is not yet available, essentially because some features are in flux that would require changes to any export scripts. We also want to work with beta testers to make sure the exports are useful. We'll add this in the coming weeks.
You can already access and use a lot of the data via JSON, from publicly accessible pages. For example, you can add .json to the end of any profile page URL.
https://noti.st/username.json
For a presentation page, remove the slug and add .json to the presentation ID:
https://noti.st/username/aAbAcC.json
And similarly for an event:
https://noti.st/events/aAbAcC.json